How to make a dollshouse needlepoint wallhanging
Hints and tips for making up a miniature wallhanging kit to enhance your doll’s house, using miniature needlepoint embroidery.
This Tutorial tells you everything you need to know to make a wonderful doll’s house needlepoint kit for a wallhanging in one twelfth scale, designed by Janet Granger. See the full range of designs available in the Needlepoint Kit Store.
This tutorial will take you through the stages you need to follow in order to successfully complete one of my wallhanging designs. This Tutorial is illustrated with the ‘Greek Musician’ design, but all the designs are completed in the same way. All of the designs are suitable for beginners to tackle, so read through this section to be sure of the best tips, then go ahead and choose a wallhanging kit for your doll’s house that will really make an impact!
The kits include everything you need to make a fantastic wallhanging for your doll’s house: 22 count mono canvas, Anchor stranded cotton (use two strands), a suitable needle, a colour block chart (i.e. the canvas is not printed), detailed instruction sheet, backing fabric, a length of ribbon to make hanging tabs, and a thin dowel to hang the finished wallhanging from if you wish.
If you have never done miniature needlepoint before, see the Index to Tutorials and read through ‘Basic Equipment Needed’, and ‘Needlepoint Stitches Used’ first, for details of how to work the main design in needlepoint, using tent stitch and basketweave stitch, then come back to this page for hints and tips on how to make up your piece of stitching into a finished doll’s house wallhanging.

Once the stitching is completed, trim the spare canvas around the design to half an inch (about one centimetre). The design itself should look like this.
 The back should look something like this.
The detail has been worked in tent stitch and the background areas have been worked using basketweave. In this photo, it is very clear to see that the basketweave stitch is worked diagonally, as the ‘start’ and ‘end’ threads have been run diagonally as well, through the backs of already-worked stitches. With large areas of the stitch, it is easy to see why basketweave stitch is called this – the pattern on the back of the canvas is very much like the pattern on woven baskets. No ‘carrying threads’ have been taken over more than about 4 or 5 stitches, in order to keep the back of the work neat and flat. If you need to ‘jump’ from one section of colour to another over a longer distance, fasten off the thread and start again.
Once all the stitching has been done, check over the whole design to make sure that you haven’t missed a stitch here and there. It’s very annoying, once a piece of work has been framed, or finished off in some way, to then notice a missing stitch! Trim any long ends on the back of your work.
The next thing I would recommend with a piece of canvaswork is to iron it. If you have used a rotating frame to mount your canvas on while stitching the design, then distortion will be minimal. If you haven’t used a frame, but simply held the canvas in your free hand while stitching, then distortion can be quite noticeable. ‘Blocking’ a canvas is what used to be recommended (in the Seventies!). That involved pinning out the canvas squarely onto a padded board, wetting the canvas thoroughly, and leaving it to dry naturally, which took several days. With severe distortion, this process had to be done several times, too, which made finishing a project a bit of a chore. I prefer ironing as it’s quicker, more successful, and, with miniature pieces, often all that is needed to get the fabric back into shape.
So, to iron the canvas, set up your ironing board with a white or pale coloured terry towel placed across it, several layers thick. Place the stitched canvas RIGHT SIDE DOWN on the towel, so that the stitches will have a soft surface to sink into when you iron the canvas, and you will not then flatten your work. Set the iron to a medium setting, with steam. First run the iron LIGHTLY over the whole surface (the reverse of your stitching, remember), so that the heat and steam starts to work on relaxing the starch in the canvas threads. Then, go back over the whole canvas several times, only lightly touching the surface each time with the iron, whilst pulling the canvas squarer and squarer each time with your free hand, starting at the corners. If distortion is severe, iron first, then put the iron down so that you can use both hands to pull the canvas to shape. Only re-shape whilst the canvas is warm and damp – otherwise, you will simply be wasting your time, as the re-shaping will not hold. Once the canvas is properly square, leave it on the ironing board to cool completely before moving it. The starch in the canvas will set again, and the shape will stay put. You may want to check with a set square to make sure the canvas is dead square – if not, go through the process again. NEVER iron on the front of the canvas whilst re-shaping – it won’t help, but it WILL ruin your stitching by flattening and dulling it!

To hem the wallhanging, take one strand from a six-strand two-foot length in the same shade as you used for the final row of needlepoint stitches, thread the same tapestry needle that you used for the needlepoint, and knot the ends together, as you will be oversewing the canvas edge with a double thickness of thread.
Start by securing the thread on the back by running the needle under a few stitches. It is easier if you start part-way along a side, rather than at a corner. Pass the needle to the front of the canvas through a hole in the last row that you used when stitching the main design. Now turn the work so that the right side is facing towards you. You will hem the wallhanging with the canvas facing this way from now on.

Fold the unworked half inch of canvas down, so that one straight row of holes is right on the crease edge.

Moving the needle to the left of where it emerged, take a stitch straight through from the back to the front, through both thicknesses of canvas. This will make a slanting stitch over the edge of the doubled-over canvas. Do not pull the thread too tight – the stitch should lay softly around the edge. Make sure all your stitches are worked at the same tension, to ensure a neat outline.
Continue in this way, making stitches straight through two layers, along the side until the thread length starts to run out.

To end the length neatly, take the needle over the top edge of the canvas for the beginning of the next stitch, but rather than come out at the front again, slide the needle under the half inch of canvas as in the photo to the right.
 Make two small back stitches through the backs of previous tent stitches in the main design to secure the thread, and cut the end off neatly. Start a new length, emerging at the front through the next hole to the left on the front, as before.
When you approach a corner of the wallhanging, make sure, when you have about an inch of stitching still to do, that you have about 9 inches of thread in the needle. If not, start a new thread length now, as it is difficult to start a new length right at the corner.
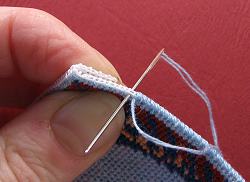
Just before you get within half an inch of the corner, fold down the adjacent side in the same way that you did when you first started to do the hemming, so that one row of holes is exactly along the crease. As you stitch nearer to the corner, start to stitch through the extra double layer of canvas, to hold it in place.
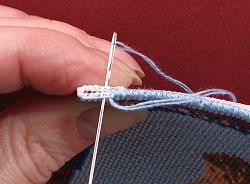
The first one or two stitches may be difficult to line up, and you might need to pull tighter than usual – if this makes the stitch look ‘threadbare’, go through the hole a second time.

When you get to the corner point, stitch two or three times through the very last pair of holes, manipulating the thread with the needle as you pull it into place so that the corner is covered with thread.
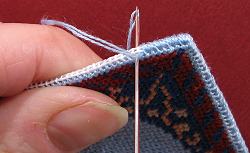
Then continue along the second side, as before. Continue hemming the wallhanging in this way, until you reach the point where you started.

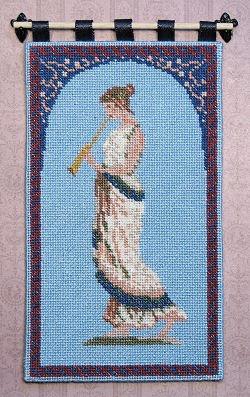
The wallhanging should now look like this…
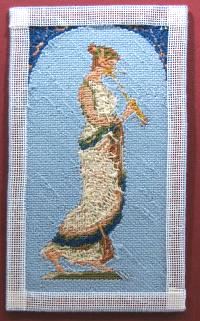
and from the back it should look like this.
You now need to lightly steam-iron it again, from the back, with a towel pad on the ironing board, as before. It should not need pulling to shape again, but ironing it again will make the half inch of canvas lie completely flat, and give a sharp edge to your wallhanging.
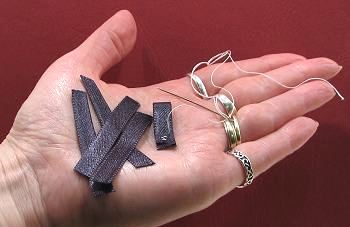
To make the tabs to hang your wallhanging from, take the length of satin ribbon and from it cut five two-inch lengths.
Dealing with them one at a time, fold each of these in half, and secure the cut ends by making a few tiny back stitches using sewing cotton and a sharp sewing needle (not supplied). Do not fasten off the thread end yet. (NOTE: I have used contrasting thread for clarity in these photos, but a toning thread would work better)

Place the first folded ribbon tab at the right hand end of the top edge of the wallhanging, about an eighth of an inch in from the side edge, with the cut ends at the back of the canvas and the fold overhanging the top edge by just about enough to get a pencil through. Holding the tab in place with the thumb of your left hand, start oversewing the tab to the unworked canvas margin by taking three or four stitches down the right hand side of the tab, then stitch back up the left hand side. Make sure that the tab is positioned vertically, and that you do not stitch right through both layers of canvas.

Secure the thread end with a good knot.
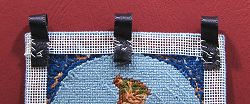
Attach the second tab to the left hand end in the same way. Position the third tab in the centre of the top edge of the canvas, measuring if necessary to get it absolutely central.
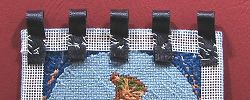
Place the fourth and fifth tabs in the gaps in between the centre and end tabs. Make sure that all the tabs protrude the same amount above the canvas edge.

To neaten the back of your work once the tabs have been stitched in place, take the piece of iron-on interfacing, and trim it to size, so that it is about an eighth of an inch smaller on each side than the total width and height of the stitching. Place the wallhanging face down on the towel pad on your ironing board again. Make sure that the STEAM SETTING on your iron is SWITCHED OFF this time. Heat up the iron to medium heat, place the interfacing on the back of your stitching (shiny side down, so that when the glue melts it will stick the interfacing to the stitching, not your iron!), making sure that it is centrally positioned, and place the iron hard down on the interfacing for 5 seconds. Do not slide the iron while you are doing this, just press firmly. Lift the iron off, and test a corner of the interfacing to see if is has adhered properly. If not, repeat for another 5 seconds. Pay particular attention to the tab area, as the uneven layers may need more pressure to obtain the right adhesion. Leave to cool completely before moving the stitching.
Finally, as the last stage in completing your kit, stain or varnish the wooden pole if you wish. When it is completely dry, slide it through the tabs. Attach two small hooks (not supplied) to the walls of your doll’s house, and hang the wallhanging pole between them.
 Alternatively, make a plait by using 15 inches of leftover thread from the kit (six strands each of three different colours works well), and knot the plait around the ends of the pole, using one central hook or pin to hang the plait from.
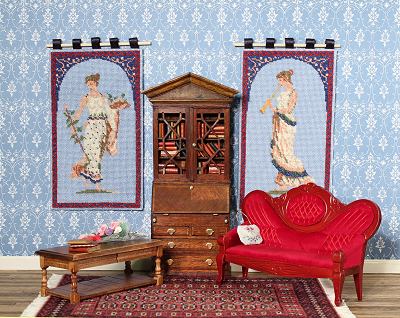
Your wallhanging is now complete, and can take pride of place in your doll’s house or room setting!
Now click on one of these next pictures to go and see the range of wallhanging kits in the Needlepoint Kit Store:

