How to make a dollshouse needlepoint firescreen
These tutorials were originally written to help people who had bought my dollhouse needlepoint kits – they show you how to do the stitching and assemble each type of kit. In November 2024 I retired, so these pages are now a ‘legacy archive’ only. I NO LONGER SELL THESE KITS, so please do not contact me asking where you can buy them! I plan to keep these tutorials available until at least the end of 2026, so that people who bought kits but haven’t made them up yet have a while to use the tutorials to complete their kits 🙂
‘Real’ houses, in the past, often had a firescreen standing in front of each fireplace – not only to look decorative, but also to deflect the draught that whistled down the chimney when the fire wasn’t lit! So, to make your doll’s house authentic, it’s a good idea to have a firescreen for each of the fireplaces in the house.

The designs shown are: in the photo on the left: ‘Flowers & Vine (peach)’ and in this tutorial, below, ‘Alice Blue’.

The kits include a piece of 32 count silk gauze, colour block chart, detailed instructions with diagrams, a needle and Anchor stranded cotton, as well as a metal firescreen kit in three parts, which can be simply glued together. Using 32 count silk gauze means that fine detail can be achieved without a very tiny count of silk gauze being used.
If you have never done miniature needlepoint before, start by reading the BASIC EQUIPMENT and NEEDLEPOINT STITCHES tutorials first, then come back to this page.
Before you begin stitching, you will need to make a card mount for the silk gauze. This will make it much easier to work on, and help to keep your stitch tension even. Cut a piece of stiff card 4 x 3 inches, with an aperture of 2½ x 1¾ inches. Fix the silk gauze to the card with masking tape along all four edges, as tautly as possible. See the HOW TO MOUNT SILK GAUZE tutorial for details.
Identify the thread colours supplied in the kit using the colour key, and use tent stitch for the detail, and basketweave stitch for the background. Start the design in the centre. Remember that one square on the chart equals one stitch, and always use a ‘stabbing’ motion, not a ‘sewing’ one. Stranded cotton comes as 6 strand lengths – use one of these strands in the needle and begin each length by knotting one end, taking the needle from the front to the back, about half an inch away from where you intend to start stitching. When the stitching is complete, if it has become slightly mis-shapen (especially if you did not use a card mount to hold the silk gauze taut), press it on the reverse side with a medium hot iron with steam, over a padded ironing board, pulling the fabric gently if necessary to get it dead square.

Preparing the stitching for mounting in the metal frame
Trim the gauze right up to the outermost line of stitches, so that no unworked gauze is left. Take care not to cut into any stitches as you cut away the gauze. DO NOT use a fabric glue first, as this may stain the stitching
Assembling the metal firescreen
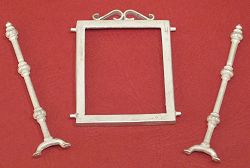

Trim off any flashing with a metal file, if necessary.
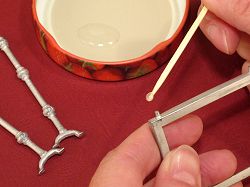
Using a suitable adhesive, such as Araldite, carefully apply glue to the four locating lugs on the sides of the frame, and fix the two legs into position to make the screen complete.
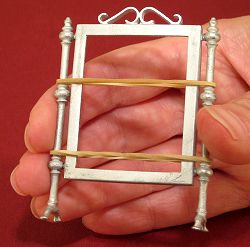
Wipe off any excess glue before it dries, and leave the firescreen upright to set, making sure that the feet are aligned correctly (perpendicular to the frame).
Putting a couple of elastic bands around the frame will help to keep it aligned while the glue sets.

When the glue has set completely, paint the screen with one coat of Humbrol metal primer, then with a coat of either Humbrol gloss or matt enamel (the colour used for each kit is given in the ‘Notes’ section below the colour key, but you can of course choose any colour). For this Alice (blue) design, I used Humbrol Deep blue gloss (number 15).
Assembling the stitching in the firescreen
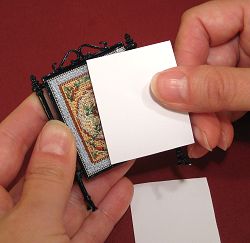
Cut two pieces of thin card, exactly 38 x 46 mm. Place the stitching in the frame, then loosely back it with one piece of card.
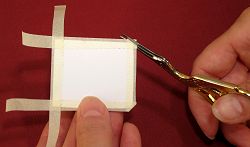
Take a piece of masking tape about three inches long, and cut it longways into four pieces. Place the second piece of card on a hard surface, and carefuly stick the strips of masking tape around all four sides, leaving only a 2mm border overlapping around the outside edge. Trim the corners of the tape where they overlap around the card by cutting at 45 degrees, to reduce bulk .

Press this second piece of card into the frame, pushing it gently into place whilst checking to make sure that the stitching is still centred correctly. Run your nail around the edges of the card, so that the masking tape makes good contact with the sides of the rebate of the frame, holding the stitching securely in place.

Your firescreen is complete!
