How to use our mahogany wax wood finishing pack
ONLINE MINIATURE NEEDLEPOINT EMBROIDERY TUTORIALS
These tutorials were originally written to help people who had bought my dollhouse needlepoint kits – they show you how to do the stitching and assemble each type of kit. In November 2024 I retired, so these pages are now a ‘legacy archive’ only. I NO LONGER SELL THESE KITS, so please do not contact me asking where you can buy them! I plan to keep these tutorials available until at least the end of 2026, so that people who bought kits but haven’t made them up yet have a while to use the tutorials to complete their kits 🙂
The Mahogany Wax Wood Finishing Pack has been developed especially for use in completing the mahogany miniature furniture kits which I sell as components in my stitching kits, such as the needlework stands, footstools and tea trays. For years, it has bothered me that people who make miniature furniture have to buy large tins of specialist waxes when really they only need a tiny bit! So, I have put together this Mahogany Wax Wood Finishing Pack which contains everything you need, in tiny containers which are plenty for the job in hand, but which will save you having to buy large amounts that you simply will never use up.

Mahogany Wax Wood Finishing Pack
Contents of the pack:
- Wood glue, 7.5ml
- Mahogany wax, 6ml
- Clear wax, 6ml
- 4 cotton buds
- 2 cocktail sticks
- Wire wool, 2” x 2” square
The waxes, used as a mixture, will be enough to do two coats on an area the size of an A4 piece of paper.
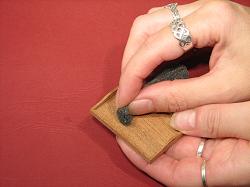
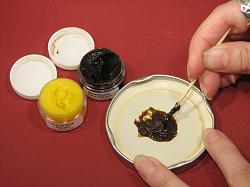
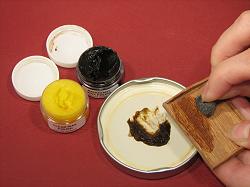
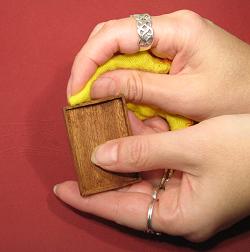
Your furniture is ready for finishing once it has been assembled and the glue has dried. Use the wood glue as directed in the instructions for the particular furniture kit you are making. The photos below show the tea tray from the Tray Cloth kits being waxed.

Gently rub all the surfaces with the wire wool until the item feels smooth all over. Make sure there is no dust left on any surface.

Blend roughly equal parts of clear wax and mahogany wax in a suitable small lid (or similar), with a cocktail stick.

It is important to mix it until it has reached a uniform colour. You do not need to warm it in any way. Only mix the amount you expect to use in one day, as you will have to discard any left over. The clear wax is needed because it hardens, and the dark wax is needed for the colour.

Apply the wax mixture to all surfaces using wire wool. Leave to dry for at least 20 minutes, then polish off with a clean duster (not supplied). Use a cocktail stick to remove any excess wax from the corners.

Further light coats of wax (you will need at least 2 coats altogether) should be applied with a cotton bud, left to dry, and polished off with the duster. You cannot polish wood too much.
Keep adding coats and polishing until you are happy with the look and feel of your item.
